
I am flying my nerd flag high today, folks. Since quarantine hit, I’ve rediscovered my childhood love of Neopets. Turns out, the website is still going strong with a very active community of players. I’ve had a ton of fun reconnecting to the game and it’s giving me something to look forward to after work and homework is done.
Last week, my guild (my community within the community) announced our May theme: Maraqua! For those of you non-Neopians, Maraqua is an underwater land within the Neopets world. I was immediately excited, because one of my favorite Neopian things is in Maraqua – Kelp, Neopia’s equivalent of a three-Michelin-starred restaurant. Even as a kid, I thought the food served at Kelp looked amazing and I always wanted to try it. Well, now that I’m an adult, I can! So I set out to create a full Kelp dinner, and then write down the recipes to share with my guild mates!
To make a short story long, I was so excited by the results that I shared them on a Neopets-related Facebook group. And after over 400 likes and comments (I feel so popular, thanks guys!) I decided to post the recipes here on the blog for everyone to have for the future.
For any Neopians reading this right now – welcome to Hohm Cooking. This is my personal blog that I use mostly for my own benefit, just to keep track of recipes I’ve tried and loved over the years. I hope you try these Neopian delicacies and have as much fun making them as I did! If you ever have questions or need help with a recipe, feel free to reach out to me!
Hohm Cooking versus Kelp!
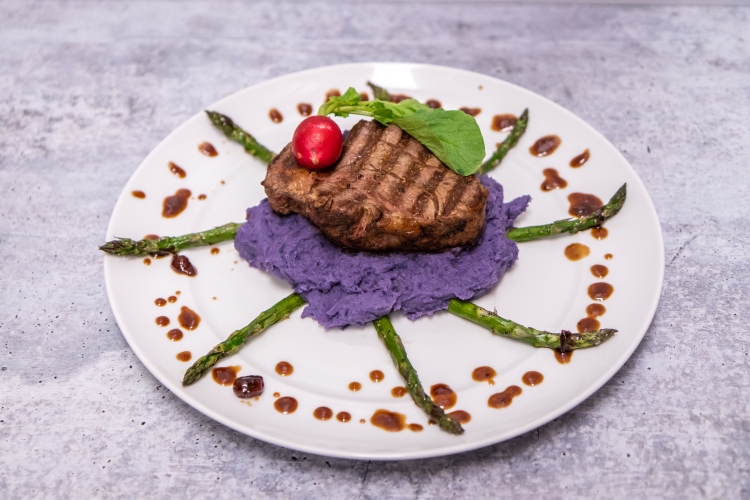
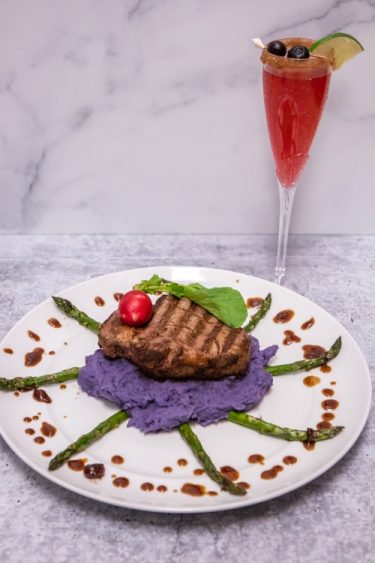
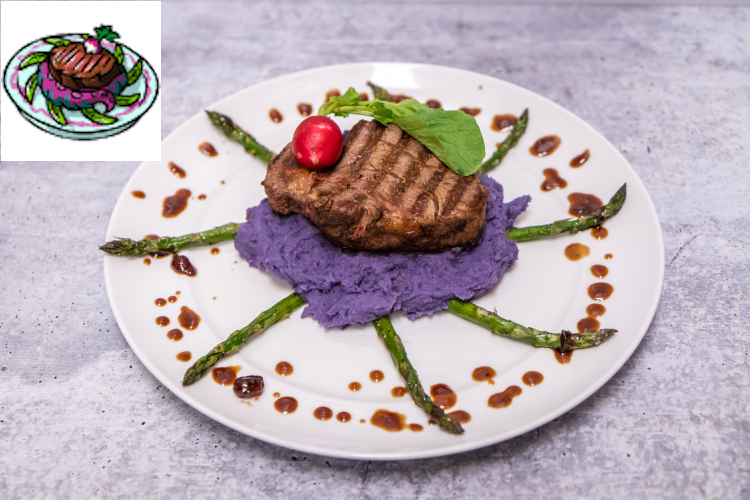
I typically post process photos of my recipes, but since I wasn’t ever planning on posting this, I didn’t take any! I hope you enjoy the end result shots though. Here is my recipe compared against Kelp’s actual Filet of Beef (image credit to the Neopet’s art team for that one!)
- 2 8 oz portions beef tenderloin or filet mingon
- Salt and pepper
- 2 Tbsp unsalted butter
- 1Tbsp canola or vegetable oil (see note 1)
- 1 radish, for garnish (optional)
- 1 Tbsp balsamic vinegar
- 3 Tbsp soy sauce
- 3 Tablespoons whole-berry cranberry sauce
- 6 Tbsp water
- 1.5 lb petite purple or blue potatoes
- 1 Tbsp salt
- 3 Tbsp unsalted butter
- 3-4 Tbsp heavy cream
- 1 bunch asparagus
- 2 Tbsp olive oil
- Salt and pepper
- Preheat oven to 400°F. Line a rimmed baking sheet with aluminum foil.
- Trim the asparagus by cutting 1” from the bottom of each stalk. Peel the potatoes and dice into quarters. Place the potatoes in a large pot, then add water (enough to cover the potatoes by about 1” of water). Toss in the salt, place on stove and bring to a boil. Allow potatoes to boil for 10-12 minutes, or until they are easily pierced by a fork. While the potatoes are boiling, start the asparagus and the steak.
- Place the asparagus on the baking sheet, drizzle olive oil and sprinkle salt and pepper over the asparagus, and toss to coat. Spread the asparagus into one layer and roast in the oven for 10-15 minutes.
- Once the asparagus is in the oven and the potatoes are boiling, preheat a heavy cast iron skillet on the stovetop over medium-high heat for 5-10 minutes. Cast iron is heavy and takes time to heat thoroughly, so handle it with caution. Once the pan is very hot, add the oil (just enough to coat the bottom of the pan).
- Season both sides of the steaks liberally with salt and pepper, and then add them to the hot cast iron skillet. Sear one side for 1-2 minutes, then flip over and sear the other side for about the same length of time (see note 2 below). Once both sides are seared, flip back to the side you started on, and let cook for 3-4 minutes. Add 1 Tbsp of butter to the top of each steak and let melt. Then flip again and continue cooking for 2-3 minutes. Finally, use tongs to stand the steak on its side and sear the edges. This should only take a minute or so. If you’re not sure about doneness, the best way to test is to use a thermometer: Medium Rare 135°F, Medium 140°F, Medium Well 145°F.
- Once done, remove steaks to a plate and let rest for 10 minutes.
- Once the potatoes are fork-tender, drain the water and move potatoes to a large bowl. Using a potato masher (or a large fork or a handheld electric mixer) mash the potatoes to your desired consistency. Add the butter and cream and mix well until the butter is fully melted. If desired, continue adding cream 1 Tbsp at a time until you’re satisfied with the taste and texture.
- To make the cranberry pan sauce, add all ingredients to the pan you just cooked the steak in, and simmer over medium heat until thickened and syrupy (about 2-3 minutes). Remove pan from the heat.
- To assemble, place asparagus spears in a wheel pattern, then spoon the mashed potatoes on top. Place a steak on top of the mashed potatoes, and drizzle with the pan sauce. Add a radish for garnish (optional).
- Enjoy!
Note 2: It’s near impossible for me to tell you how to properly cook a steak. There are many variables, including whether you’re using a cast iron skillet like I used, a cast iron griddle pan, a stainless steel pan, a nonstick pan or a grill. It also depends on the thickness of your steak, and whether you let your steak sit at room temperature for 45 minutes before cooking (best practice), or if it’s been plucked straight from the fridge (that’s what I do, because I’m forgetful and don’t remember to take the steak out ahead of time…). And even then, it depends on how cold your fridge is versus mine. Not to mention that everyone has a different preference for steak doneness. To the best of my ability, this recipe is written to produce a medium-rare steak in a cast iron skillet on an electric stovetop using a 1” thick cut of beef tenderloin.
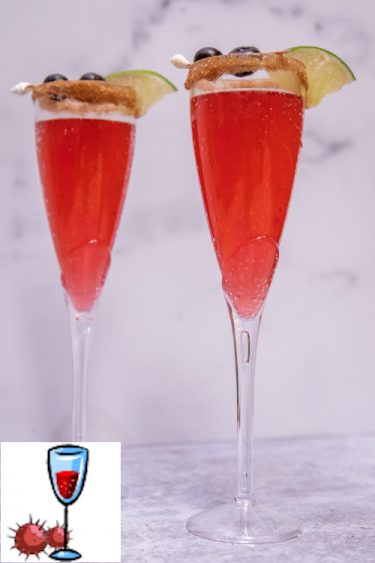
Since I can’t have “thornberries” I used cranberries!
Here’s a quick shot of how to apply the lime and sugar rim for this drink. The full recipe is below.
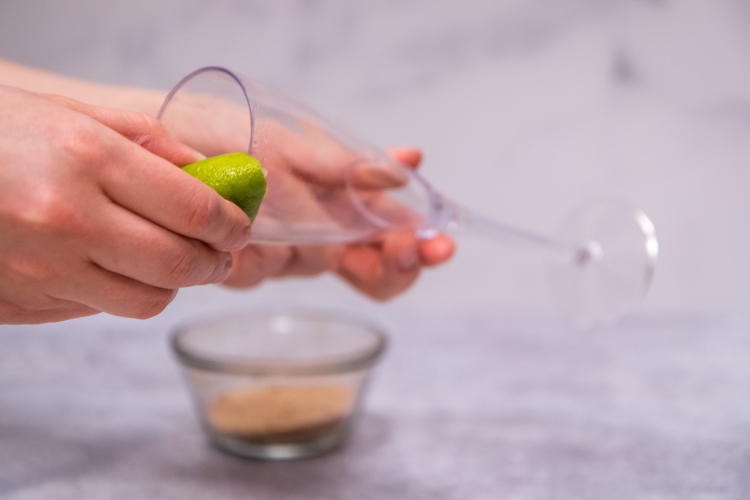
Use the squeezed lime to cover the rim of the glass in juice
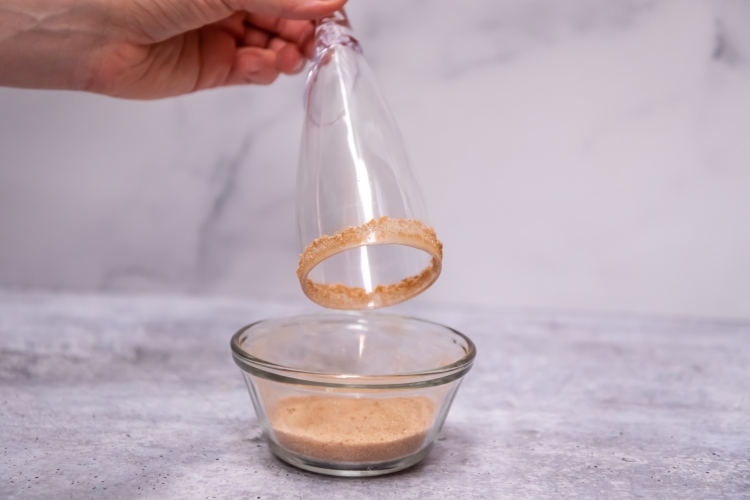
Then dip directly into the sugar mixture and swirl to coat.
Don’t forget to read the notes for my suggestions on how to turn this mocktail into a real cocktail!
- 12 oz ginger ale
- 12 oz cran-apple juice
- Juice of 1 lime
- 3 Tbsp sugar + ½ tsp cinnamon (optional, for garnish)
- Combine the ginger ale and cran-apple juice in a large pitcher, Cut the lime in half (slice off and save a wheel for serving, if you want) and squeeze into the mix. Save the lime halves for garnishing.
- Combine the sugar and cinnamon in a shallow bowl. Use a lime half to coat the rim of your glass with lime juice, then dip the glass into the sugar.
- Pour the mixture into glasses, garnish with reserved lime wheel, and enjoy!
(Recipe credit: Karianne @ Thistlewood Farms)
Now for the grand Finale! The Triple Chocolate Shell!
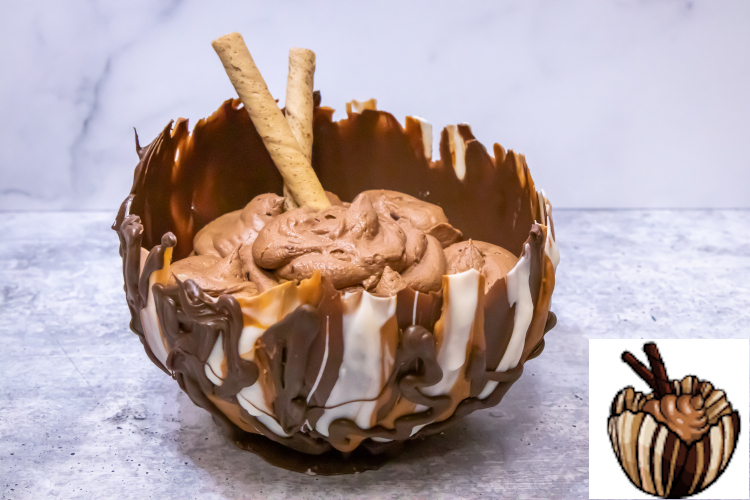
I used dark, white and salted caramel candy melts to make this bowl!
- 3 cups heavy whipping cream, divided
- 12 ounces (2 cups) semi-sweet chocolate chips
- 2 pirouette cookies (optional, for garnish)
- 3 bags chocolate candy melts, any colors
- 4 balloons
- Cooking spray
- Microwave 1 cup of heavy whipping cream in a large microwave safe bowl for 1 minute. Add the chocolate chips, stir slightly. Microwave the mixture for another 30 seconds, then stir until the chocolate is fully melted and the mixture is smooth, silky and a rich chocolate color. Set aside to cool.
- In the bowl of a stand mixer (or using a large bowl and hand mixer) whip the remaining 2 cups cream on high speed until it is stiff.
- Add the whipped cream to the bowl of now-cooled chocolate ganache, and fold gently to combine. It’s okay if there’s still some white flecks of whipped cream in your mixture – just be careful not to overmix, or the whipped cream could deflate.
- Cover the bowl tightly with plastic wrap and place in the fridge for at least two hours until you’re ready to serve.
- To serve, either transfer the mixture to a piping bag and pipe into bowls, or simply scoop the mousse with a spoon into serving bowls.
- Inflate two balloons to your desired bowl size. Wash well, and dry thoroughly. Then, spray liberally with a nonstick cooking spray, or coat with some olive oil. Rub the balloon to ensure the nonstick spray is applied evenly.
- In a microwave-safe bowl, melt ½ a bag of chocolate melts according to the package directions. This should be your “base color,” or whatever you want the main structure of the bowl to be. I used dark chocolate melts.
- Once melted, use a silicone spatula to spread the melted chocolate over the balloon to the desired height of your bowl. I recommend doing this over the sink, as it is likely to drip and cause a mess. Make sure the layer is thick enough that you can no longer see the balloon through the chocolate.
- Place a spoonful of melted chocolate onto parchment paper on a baking sheet. Once you are done with your base layer, place the balloon chocolate-side-down onto the tray, and hold it in place for a few seconds to let it set. Move the whole tray to the fridge to chill for 15 minutes.
- If you are making more than one balloon, repeat this process with your second balloon while the first waits in the fridge.
- After the base layer of chocolate has set, it’s time to add your accent colors. Add ¼ package of chocolate melts (in whatever accent color you choose) to a piping bag or Ziplock (be sure to close with rubber band to prevent leaking!). Microwave until melted, and massage the bag to ensure all chocolate melts are melted. Cut off the tip of the bag (as wide or as narrow as you wish, depending on the design you’d like). Take one of the now-cold balloons from the fridge, and pipe the accent color onto it in whatever pattern you choose. Once you are done, return the balloon to the fridge and allow to chill for another 15 minutes. Repeat this step for as many balloons or colors that you have.
- Once the chocolate has set, remove balloons from fridge. Cut a very small hole in the top of the balloon, near the tie (you want it to deflate as slowly as possible, not pop!). Slowly peel the balloon away from the bowl until it is completely removed. Return bowls to fridge until you’re ready to serve.
(Recipe Credit for Chocolate Mousse: The Kitchn)
I did take a few photos of the process of making the chocolate bowls, since they seemed to be the thing most people wanted to recreate.
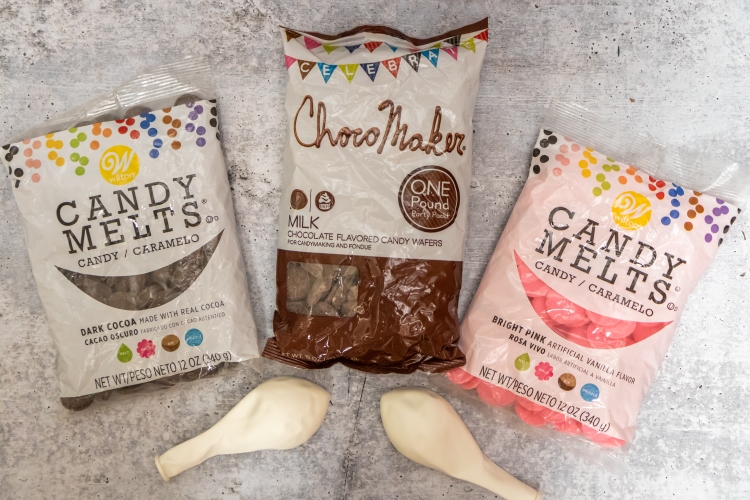
All you need to make these cool bowls are some candy melts (Walmart sells them!) and balloons.
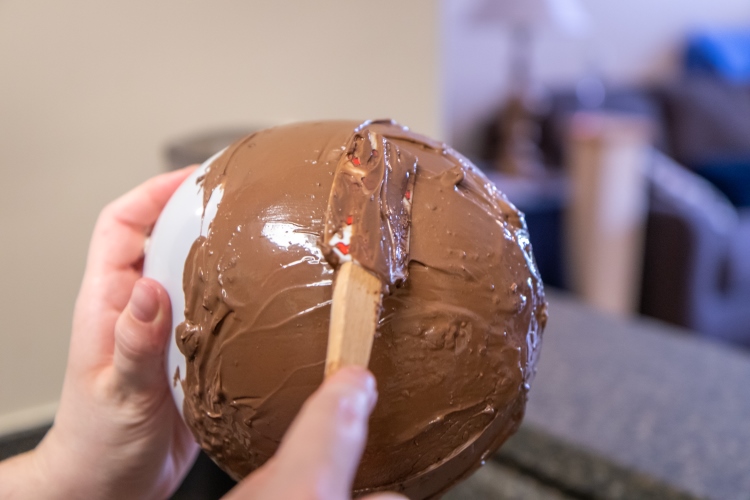
I found that using a small silicone spatula works best for spreading the chocolate
Aaaaaaaand about 30 seconds after we took this photo, the balloon exploded. I then needed a shower and we needed a carpet cleaner to remove the molten chocolate from the carpet in our living room, 15 feet away from where we were standing. Note to self – check the balloon for any weak spots BEFORE pouring hot chocolate onto it. And maybe let the chocolate cool down slightly before applying…
If at this point you’re still confused or intimidated by making a chocolate shell, one of my favorite YouTubers has an excellent video tutorial. Here it is:
And that’s all, folks! I hope you enjoy these recipes, and let me know if you make it at any of them at home!

Oh my goodness. Making that chocolate shell looks so intimidating! But the finished product is so worth it. You did an amazing job on these items. I can’t wait to try the cocktail this weekend. 😉